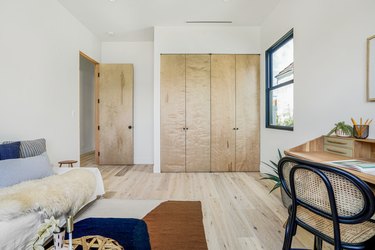
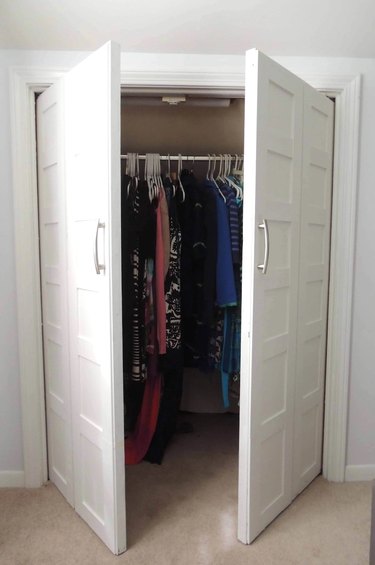
Bifold doors make great bedroom closet doors, and if you have any in your house, you appreciate how easy they are to operate and to maintain, but there are a few things you probably don't appreciate. Because they fold like an accordion, they block part of the door frame when they're open and limit your access to the closet. Moreover, you or one of your kids may have gotten fingers pinched between the panels when closing the doors. You can remedy this with a simple DIY makeover that turns those pesky bifold doors into French doors that provide access to the entire closet with the doors open.
This sounds like a big job, but it's a piece of cake for anyone with basic carpentry skills. Bifold doors are lightweight, so there's no heavy lifting involved, and you have your choice of a quick basic makeover or a slightly more time-consuming one that can make those French doors forget they were ever closet bifold doors.
Video of the Day
Video of the Day
If you peruse the internet, you'll find a plethora of design ideas for this project, which attests to how doable it is. It's not a bad idea to research them, but when it comes down to it, you'll end up doing it your way to get the results that best suit your home décor sensibilities.
An Overview of the Process
Before you dive into the project, it's good to have an idea of what you're up against. Very simply, what you'll be doing in this DIY project is:
- Taking down your closet bifold doors (or maybe they are doors to the laundry room, a pantry, or even the dining room).
- Removing all the bifold accessories from the doors and the door frame.
- Attaching hinges to the door panels and rehanging them in the frame.
- Removing the hinges connecting the door panels (and if you have a double bifold door, you'll be connecting the two pairs of panels together to make two single panels).
- Filling holes and painting the panels.
- Installing door hardware, such as doorknobs or a door handle, and a magnetic catch or some other mechanism to keep the doors closed.
The process is pretty straightforward for a single bifold, but if you have a double bifold door, the method you use to connect the panels will make the difference between a utilitarian job and top-quality one. The utilitarian method is to connect the panels with metal plates, but if you do that, you're always going to see the plates. That may be fine for a closet, but for a passage door, you need a more sophisticated method, which is to glue and screw the panels together and then fill and sand the gap between those panels on both sides. It takes more time, but as with most DIY home improvement projects, the extra time is worth it.
How to Turn Bifold Doors Into French Doors
Before you start, make sure you have a large, flat area or a pair of sawhorses where you can lay the doors. Since you'll probably be sanding and painting the doors, it's best if this is in the garage, in the basement, or outside. There's no sense messing up the carpet in the living areas of your house.
Step 1: Demo the Old Bifold Door
Unscrew and remove the handle from the bifold door so it doesn't get in the way. Locate the spring-loaded roller at the top outside edge of the door, push it down, and swing the outside edge of the door toward you. Lift the opposite edge of the door high enough for the bottom pivot to clear the cradle. That frees the door so you can remove it. Lay the door flat so you can unscrew and remove the hinges holding the panels together.
Once you're finished with the doors, unscrew and remove the track from the top jamb of the door frame. The track may be covered by a trim piece, and if so, pry that off with a pry bar. Unscrew the pivot cradle (the bracket at the bottom of the door) from the side jamb or the floor while you're at it. If there is door stop trim attached to the side jamb, you'll want to pry that off too because the French doors will need different stop trim.
Step 2: Connect the Door Panels
You could simply lay the panels next to each other, align the tops, and join the panels by screwing on two or three metal plates to hold them together. That will work, but this tutorial describes a way to do the job with hidden screws for more panache.
- Get a 3/8-inch wood-boring drill bit (not a spade bit) and wrap painters' tape around the bit about 1/2 inch from the tip to indicate how deep to drill the countersink holes.
- Drill 3/8-inch countersink holes that are 1/2 inch deep into the side of the frame (the stile) of the door. It's important not to drill these holes too deep or the screws won't hold. The holes should be as close as possible to the top of the stile and angled slightly downward to give your drill enough clearance to drive screws. You'll need about six or seven equally spaced holes, with one screw placed as close as possible to the top and bottom of the stile.
- Spread a generous amount of wood glue on the edges of both panels and then butt the panels together, align the tops and bottoms, and use at least two C-clamps to clamp them together.
- Drive a screw into each countersink hole that is long enough to bite into the adjacent panel by at least 1 inch. If the door has 1 3/4-inch stiles, for example, use 2 1/2-inch screws, and if the stiles are only 1 inch wide, use 1 1/2-inch screws. Wipe off any glue that has oozed out using a damp rag.
- Leave the panels clamped overnight to give the glue time to set.
Tip
You can use the glue-and-screw method for solid doors as long as you drill the countersink holes with a downward angle. The countersink holes for these pocket screws should be drilled at least 1 inch from the edge. Don't forget to use screws long enough to bite at least 1 inch into the adjacent panel.
Step 3: Fill and Sand
Use patching compound, such as Durham's Water Putty, to fill the gap between the doors (on both sides) and the screw holes. Mix the powdered compound with water to a honeylike consistence and spread it using a stiff, plastic putty knife. The compound will sink in, so after it sets, add a layer of fiberglass auto body repair putty, such as Bondo, to fill in the depressions. Fiberglass putty provides a smoother final surface than patching compound and should all but disappear. Be sure to remove as much excess putty as you can while you're working to make sanding easier.
Sand the putty flat using an orbital sander and a 100-grit sanding disk. When you're finished, sand again with a 120-grit sanding disk to remove scratches and create a smoother surface. You can even sand a third time with a 150- or even 220-grit disk if you want a really smooth surface.
Step 4: Paint the Doors
Clean the doors with a damp rag to remove dust and scrape off any loose paint using a paint scraper. Apply primer to the parts of the door that have been puttied as well as any areas showing bare wood using high-solids wood primer. The easiest way to apply the primer is with a spray can, and it will give better final results than brushing.
When the primer dries, scuff it lightly by hand with 220-grit sandpaper and paint the door. Again, the best way to apply the paint, especially if the doors are louvered, is to spray them with a spray can. You'll probably need two coats, and scuffing with 220-grit paper after the first coat will produce the best-quality final finish.
Tip
Be sure to put on a respirator, cover any nearby furniture before you spray, and open a window before you spray.
Step 5: Hang the Doors
Screw a pair of door hinges to the hinge side of each door, placing one about 12 inches from the top of the door and one 12 inches from the bottom. Put a spare piece of wood that is 3/4 inches thick on the floor under the door frame and set the door on the wood to create a gap between the bottom of the door and the floor. You can tap out this wood after hanging the door using a hammer.
Align the door with the outsides of the top and side door jambs in such a way that the hinge pins extend just beyond the door casing. It's a good idea to use a level to make sure the door is vertical, but you can also use the level to verify that the jamb is plumb, in which case you can use it as a reference. Screw the hinges to the jamb. A gap between the door panel and the jamb is acceptable for this type of door, so there's no need to mortise the hinges. Repeat with the other door.
Step 6: Attach Door Stops, Door Catches, and Handles
Nail strips of 3/8 x 1 1/4-inch door stop trim to the jamb on both sides and along the top. The easiest way to do this is to close both doors and, working from inside, position the trim against the doors and nail it to the jamb with finish nails. Leave a 6-inch gap in the center of the top jamb for the door catches. Sink the heads with a nail set and fill the holes with spackling compound. Then, sand and paint.
You'll need door catches to keep the doors closed, and you can use magnetic ones or another type. Screw one part of the catch to the top jamb in the gap you left in the door stop and the other part to the top of the door.
Finish by attaching the handles of your choice to the front of the doors. If you want the doors to look like French doors as closely as possible, install dummy doorknobs that screw to the front of each panel door. These don't have latches, so no drilling is involved. Otherwise, choose any handles that conform to the door style you're after.
- The 2 Seasons: How to Turn Bi-fold Doors into French Doors
- YouTube: Checking In With Chelsea - Convert Your Bi-Fold Doors with This Trick!
- Home Affluence: How To Remove Bifold Doors | A Step By Step Guide
- Remodelaholic: Bifold Door Makeover Into French Doors
- YouTube: Ana White: Non-Mortise French Closet Doors
- YouTube: Steve Ramsey - Woodworking for Mere Mortals: Can You Make Pocket Holes Without a Jig?