Replacing Vinyl Siding
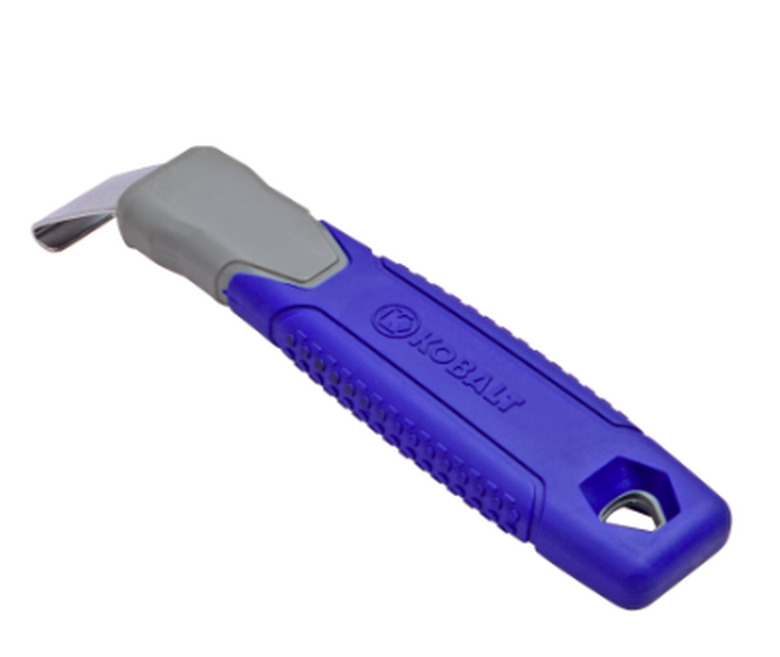
You wouldn't try to remove a deck screw without a power drill, and you shouldn't disassemble vinyl siding without a zip tool. This convenient little piece of metal with its plastic handle is designed to fit into the seam between interlocking vinyl siding panels and separate them. You then separate the entire panel by running the zip tool along its length, like a zipper. At least, that's how it's supposed to work. Nine times out of ten, the process is fairly effortless, and once the panels are separated, you can pull out the fasteners holding the lower panel to the sheathing.
The zip tool is also called a siding hook, not to be confused with the utility hooks for hanging decorations and Christmas lights from vinyl siding. It is also your go-to implement when it's time to install the replacement panel. Just as the pull tab on a zipper can open and close the zipper, a zip tool can lock paneling together as well as unlock it.
Know Your Siding
Know Your Siding
Most vinyl siding panels available today interlock in such a way that a zip tool can unlock them, but not all panels are compatible with the tool. Check the brand of your siding before trying to remove a panel, because rigid vinyl and insulated vinyl panels made by CertainTeed and other manufacturers are not flexible enough to unhook. The manufacturer's recommended method for removing a damaged CertainTeed panel is to cut out a large rectangle, then work a pry bar underneath the nails holding the panel to the sheathing and prying them out. To install the replacement panel, you'll need special fasteners available from the company. If you have CedarMax panels manufactured by ProVia, you may be able to unhook them with a zip tool or a pry bar, but you may also need a special siding removal tool. Check with the company for recommendations.
How to Replace a Conventional Vinyl Siding Panel
How to Replace a Conventional Vinyl Siding Panel
Removing a conventional siding panel with a zip tool is a job that shouldn't take more than about five minutes. The general idea is to work the tool under the bottom tab of the panel above the one you want to remove and unhook the tab. That exposes the fasteners and makes them easy to remove. Installing the replace panel is basically a matter of reversing the process: nailing the panel in place, then using the zip tool to lock it to the siding panel above it.
Things Needed
-
Zip tool
-
Pry bar
-
Drill/driver
-
Tape
-
Stud finder
1. Separate the Panels With the Zip Tool
The zip tool has a bend between the handle and the hook; the angle makes it easy to grip the tool as you unlock the siding panel from the panel above it.
- Hold the tool so that the bend extends upward. Insert the hook under the tab of the panel above the one you want to remove.
- Lift the handle and the hook will lever the siding tab outward and separate the panels at that point.
- Keep the handle lifted and slide the zip tool horizontally along the panel to the other end. This detaches the tab across its length, completely separating the panels.
2. Remove the Fasteners
To remove a siding panel after unlocking it, you must remove the nails or screws that hold the panel to the sheathing.
- Lift the bottom edge of the upper panel to expose the fasteners that hold the underlying panel (the one you are removing) to the house sheathing.
- If the panel is nailed, remove the nails with a pry bar. If it is screwed, take out the screws using a drill/driver.
- Once the fasteners are out, let the panel drop to unhook it from the one below and remove it.
3. Attach the New Panel
The new panel must be first secured to the house sheathing before you can use the zip tool to lock it to the panel above.
- Cut the new panel to the appropriate length using a utility knife or a hacksaw.
- Hold the new panel in front of the panel below. Make sure it is aligned with the open space, then lift it into place, pushing on the bottom edge to make sure it hooks onto the lower panel. The top edge should go underneath the panel above it.
- Use tape to hold the panel in position while you fasten it.
- Lift the bottom edge of the upper panel to expose the perforated nailing flange on the new panel.
- Drive screws or nails into the perforations to secure the panel. The fasteners should be driven into studs, so if you don't know where the studs are, use a stud finder to find them.
4. Lock the Upper Panel to the New One
The final step is to use the zip tool to secure the bottom tab of the replacement panel to the panel above.
- Starting at one end, insert the hook end of the zip tool underneath the bottom tab of the upper panel and lift the handle to draw out the edge of the tab.
- Push the upper panel against the new one and slide the zip tool along the tab to the other end, pushing as you go. This will lock the panels together.
Helpful Tips
Helpful Tips
Vinyl siding tends to fade in the sun, so if your siding is more than a few years old, you may have trouble getting a replacement panel with a matching color. Even if the panel comes from the same manufacturer and has the same factory finish, it could end up standing out like a sore thumb. One way around this is to paint the new panel before you install it. You can do this with acrylic latex paint if the color light enough. Pastel colors reflect sunlight and won't overheat the vinyl and peel off. The same isn't true for darker colors, like forest green, but you can find vinyl-safe dark colored paint formulated with reflective material that will do the job. Add pigment as needed to get an exact color match.


