Uncoupling Membrane: What You Need To Know
If you're going to install floor tile, you need some kind of underlayment, like cementboard (tile backerboard) or an uncoupling membrane. Plywood isn't suitable because it's too flexible, and it isn't waterproof. Concrete may be rigid enough, but it's also prone to moisture, and it can expand, contract and crack.
Tile installers usually use cementboard as a tile underlayment over a standard plywood subfloor, but as Home Flooring Pros advises, there are situations for which an uncoupling membrane is a better choice. It's completely waterproof, and it allows the subfloor and tile layer to move independently.
What Is an Uncoupling Membrane?
What Is an Uncoupling Membrane?
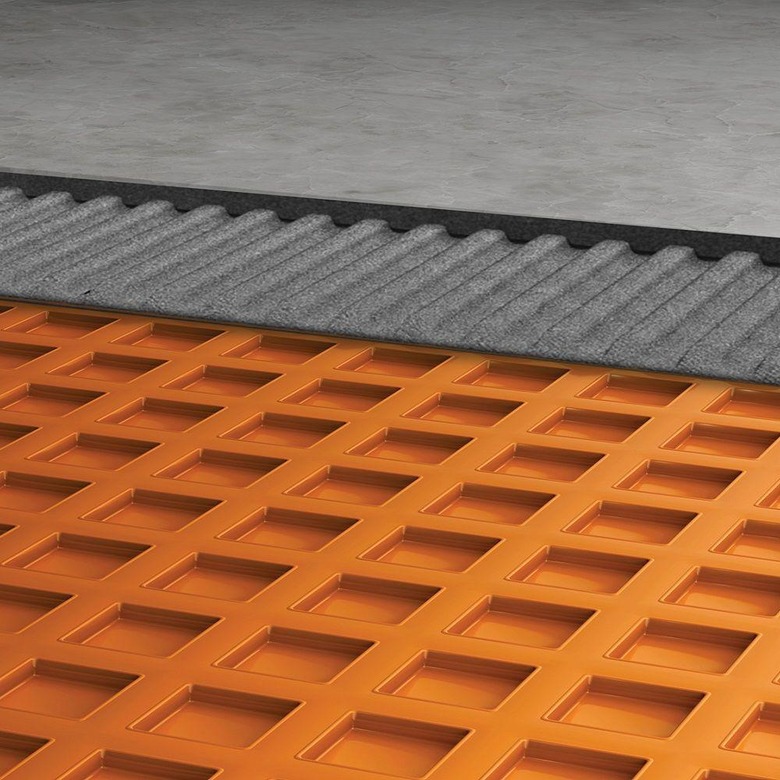
Known as "dimple mat" by some contractors, an uncoupling membrane is a 1/8-inch-thick sheet of plastic material with a synthetic fabric or fleece backing and a surface covered with square cavities, or dimples. The felt backing anchors onto a layer of thinset mortar applied to the subfloor, and the dimples on the top hold another layer of thinset for adhering the tiles.
The leading brand of uncoupling membrane is Schluter-DITRA, which is manufactured in Germany but is widely available in North America. Other product options include Laticrete Strata Mat, Mapeguard Underlayment Membrane and NobleSeal TS (which does not have dimples on the top).
Uncoupling membranes are made of polyethylene or a similar material to make them completely impervious to moisture, unlike cementboard, which actually does broadcast moisture from the subfloor. Uncoupling membranes differ from cementboard in three other important ways:
- They are flexible (non-rigid) and provide no support for the tiles.
- They are only 1/8 inch thick and raise the height of the finished floor by a negligible amount.
- They require no fasteners (just adhesive) to hold them to the subfloor.
When to Choose an Uncoupling Membrane
When to Choose an Uncoupling Membrane
Uncoupling membranes are primarily designed for use over concrete slabs and subfloors, especially ones with defects, such as depressions or high moisture levels. In addition, they provide a stable substrate for tile installation on oily asphalt or extremely smooth surfaces for which adhesion is a problem. Concrete naturally expands and contracts, especially if it's wet, and these movements can cause cracking. Uncoupling membrane prevents cracks in the concrete from affecting the tiles.
You can also use an uncoupling membrane on a wood subfloor, provided the subfloor does not need the added stiffening of cementboard. One advantage of uncoupling membrane in this situation is that it doesn't raise the height of the floor as much as cementboard. However, the subfloor has to be rock solid, which usually requires close joist spacing and at least two layers of plywood subflooring. Contractors often use uncoupling membranes when tiling shower floors and countertops.
How to Install an Uncoupling Membrane
How to Install an Uncoupling Membrane
Before you install an uncoupling membrane on a concrete subfloor, you must patch cracks and take steps to prevent the cracks from spreading. The mortar layer you apply to anchor the membrane fills low spots, but it can't remedy high spots, so you have to chisel or grind these down. You should also clean the concrete with a solution of trisodium phosphate (TSP) and water, which removes oils and etches the surface, improving mortar adhesion.
To install the membrane, you apply a coat of thinset mortar using a notched trowel. While the thinset is fresh, you unroll the membrane onto the floor fabric-side down using a grouting float to tamp it down and butting sheets together at the seams without overlapping them. There's usually no need to tape the seams unless you need a very high degree of moisture protection, such as you would need on a slab below grade or outdoors.
You use the same method to install an uncoupling membrane on a surface other than concrete, such as plywood or oriented strandboard (OSB). Because the membrane provides no rigidity, you may have to take extra steps to solidify the wood substrate, such as driving extra screws to hold it more securely to the joists.
Installing Tile on a Dimple Mat
Installing Tile on a Dimple Mat
You need to give the anchoring mortar time to set — usually 24 to 48 hours — before installing the tile. Spread the mortar over the membrane, completely filling the dimples, and create ridges with a notched trowel. Set the tiles in the mortar while it's fresh using spacers to keep them uniformly separated and the grout lines straight. Apply the grout when the mortar hardens, which takes another 24 to 48 hours.


