How To Clear A Clogged Kitchen Sink
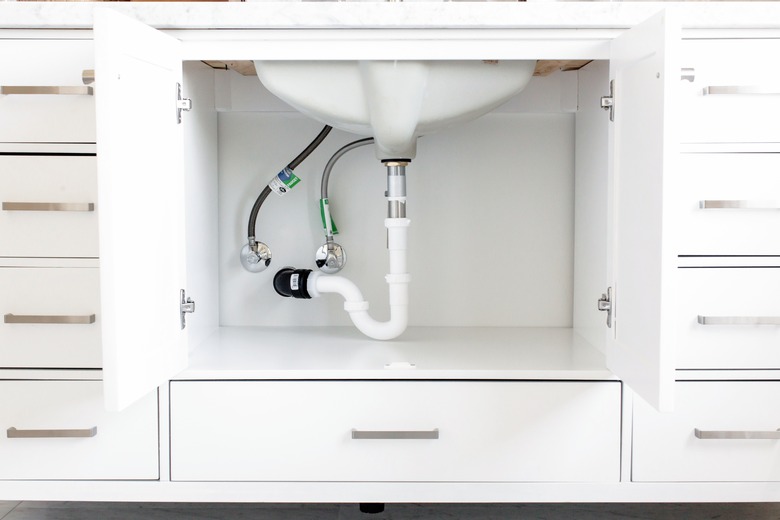
The kitchen sink drain in most houses is only 1 1/2 inches in diameter, and when you think about it, that isn't very wide — it's just a little wider than the "O" you make when you put your thumb and index finger together to signify that everything's OK. Considering the fact that gunk from the sink has to go around two or three bends in this confined space before reaching the comparatively spacious 2-inch waste pipe in the wall, it's no surprise that the pipes get a clog now and then.
The average kitchen sink clog is nothing to worry about. It's usually a thin barrier near the drain opening caused by a combination of starches, congealed oils and vegetable fibers that you can force open with a plunger. Some clogs, such as those caused by hardened materials such as flour and — heaven forbid! — plaster that you put down the drain aren't as benign and require more juju to clear. Besides not ever putting those materials down the drain, there are ways to prevent clogs from building to the point at which clearing them becomes an onerous task.
If you called a plumber to clear your drain clog, that person would follow a strategy that progresses from easier to more involved procedures that take more work. In most cases, you can skip the plumber and follow the same strategy yourself. Make it a DIY project.
Forget About Drain-Cleaning Chemicals
Put away that Drano! Its main ingredient is sodium hydroxide, which acts by converting the oils and greases that clog pipes to a soapy emulsion that can wash away — but in the process, it can generate enough heat to make water boil. That's not good for plastic pipes or the glue that holds them together, and the reaction can corrode metal pipes.
To be fair, the manufacturer of Drano addresses this concern on the Drano website, claiming that one product, Drano Max Gel Clog Remover, contains a chemical that protects the pipes from corrosion. Not all Drano products contain this additive, but even if they did, caustic drain cleaners containing sodium hydroxide have other drawbacks. For one, they cause skin burns and can get stuck in the pipes, creating a hazard for anyone who has to disassemble the pipes to clear a clog that the drain cleaner didn't dissolve.
On the opposite end of the pH scale, an acidic drain cleaner isn't much better. Products that contain sulfuric acid can also corrode pipes, and like products containing sodium hydroxide, they are bad for septic systems and the environment in general. Enzymatic drain cleaners are safer, but they tend to work slowly and probably won't provide the instant relief you're after. Green Gobbler, a fast-acting enzymatic cleaner, is a possible exception.
Check the Garbage Disposal
When there is standing water in a sink with a garbage disposal, the disposal itself is usually responsible, and that's easy to check. Just turn on the water and start the disposal, and the water will probably start flowing. If the garbage disposal won't turn, it needs to be manually unjammed and reset, so follow the manufacturer's instructions for doing that before proceeding to drain cleaning.
Proper use of the garbage disposal, including watching what you put into it, is crucial if you want to avoid standing water in the sink. Certain items, such as fibrous or starchy vegetables, coffee grounds and greasy and oily foods, are almost guaranteed to gum up the disposal and the pipes and should never go into your garbage disposal. If the disposal seems to be taking a long time to grind food, consider cleaning it by grinding a combination of ice and kosher salt and baking soda, followed by a few lemon peels.
On the other hand, you may find that the standing water remains in the sink even when the garbage disposal is working properly. That means you have a drain clog, but running the disposal may still help. The pressure it generates in the pipes when it's running is often enough to clear the clog.
Natural Cleaning Methods
Natural cleaning methods for a clogged sink, such as pouring boiling water down the drain or mixing white vinegar and baking soda to create a cleansing volcano of carbon dioxide, have been circulating on the internet since the days of dial-up connections. They often work, but only for clogs that you could probably easily clear by plunging. They won't have much effect on an impacted clog, for which mechanical cleaning options are vastly more effective.
Start by Plunging
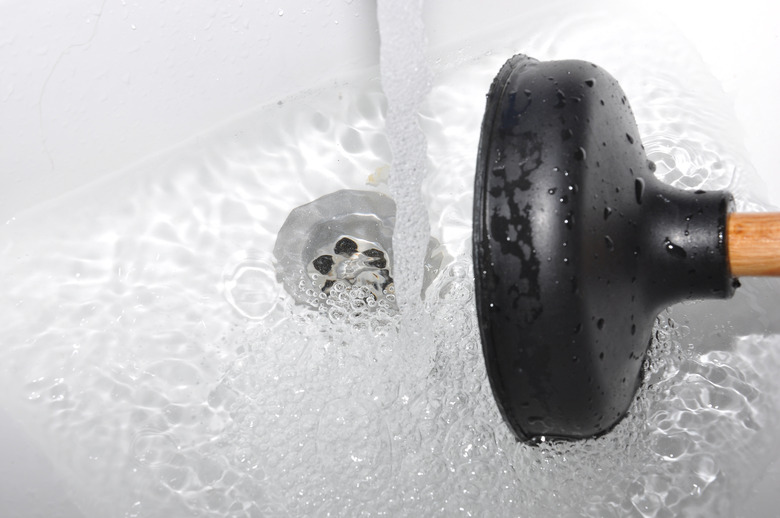
American Home Shield recommends plunging only after you've tried boiling water, baking soda and other remedies, but actually, it's the first thing you should do. When done properly, plunging clears most drain clogs. To do it properly:
- Cover the overflow holes with tape (if your sink has them). If you're plunging a double sink, stuff a rag into the drain of the sink you aren't plunging. This concentrates the force you generate with the plunger on the clog. It also helps if you remove the dishwasher drain hose (from the sink drain, garbage disposal or air-gap device) and plug the inlet with a rag.
- Fill the sink with an inch of water. If there's already standing water, that's fine, but if the sink is empty, put the stopper on the drain and fill the sink. Don't remove the stopper until you're ready to plunge.
- Use a dome-shaped sink plunger, not a bell-shaped or bellows-style toilet plunger.
- Remove the stopper and immediately fit the plunger around the drain opening and press down to prevent water from draining. You'll know you've formed a good seal if the water level in the sink stays where it is.
- Pump vigorously about 10 times and then remove the plunger. If the water starts to drain, turn on the faucet and run water to push the clog down the drain, and you're done. If water doesn't flow, try the whole procedure again, repeating until you're sure that plunging isn't going to work.
Snake the Drain
Plumbers refer to a drain auger as a snake, and to clear a kitchen sink drain, you need a sink-drain snake, not a toilet snake, which is larger and won't fit. You can purchase a sink auger that comes in a retractable barrel with a handle or with a winding mechanism that you can operate with a drill. Whichever type of sink auger you use, feed the head into the drain and keep pushing until you contact the clog. Then, start cranking to rotate the head of the snake so that it eats its way through the obstruction.
A sink drain snake obviously won't work if there's a garbage disposal in the way, in which case you have to move on to the next step, which is to disassemble the drain. If the drain has a nonremovable strainer that makes snaking impossible, try clearing the drain with a 2- or 3-foot length of spare 12- or 14-gauge electrical wire, which is more flexible than the widely recommended coat hanger. Also, don't underestimate the efficacy of using a Zip-It tool, which is essentially a barbed cable tie and is great for removing hair and vegetable fibers from near the drain opening.
Disassemble the Drain P-Trap
When plunging and snaking fail, it's either because some material has hardened in the drain or because the obstruction is too far from the drain opening to dislodge, so the next step is to take the drain apart.
Start by emptying the sink, using a sponge if necessary, and then unplug or disconnect the garbage disposal and disconnect the dishwasher drain hose. Place a bucket directly under the P-trap. Unscrew the P-trap slip nuts by hand or with locking pliers and then remove the curved portion of the trap carefully and tip it into the bucket to empty it. Some water will also drain out of the sink tailpiece (the straight, vertical pipe just below the sink) when you pull off the P-trap.
Take the trap outside and manually clean it. Then, feed the sink auger or a length of electrical wire in through the open waste pipe to dislodge any obstruction that may be farther down the waste line or at the point where the drain drops to the sewer.
Find a Cleanout
If none of these procedures are successful, locate the cleanout for the drain, which may be visible in the sink cabinet or may be accessible from the crawl space or someplace underneath the kitchen floor. Unscrew the cleanout cap with locking pliers and feed a snake or a length of wire into the opening and keep feeding until it contacts the obstruction. Then, crank or push to dislodge the obstruction.
Using a Drain Bladder
A drain-cleaning bladder is a heavy-duty rubber balloon that can be a powerful tool for clearing clogs. It has an inlet that connects to a garden hose, and when you fill it with water, it expands in the drain, and the pressure it creates can dislodge even the most stubborn clogs. Some models have a valve on the opposite end from the water inlet that sprays a jet of water, making clog-busting even more effective.
Drain bladders must be used with caution because they can damage the pipes. The safest way to use one is to remove the P-trap, stuff a rag into the waste opening and introduce the bladder through a cleanout. That way, if the clog doesn't move and the pressure becomes excessive, the rag will pop out of the waste opening before the pipe seals burst.
How to Prevent Drain Clogs
One of the most important ways to maintain your sink drain is to refrain from putting anything in it that will cause a clog. This includes large pieces of food that can collect in the bottom of the trap, starchy foods such as potatoes and pasta and greases that can congeal and harden on the sides of the pipes. Never, ever use the kitchen sink drain to dispose of construction materials such as joint compound, patching plaster or paint.
Treating your drain regularly with an enzyme-based drain cleaner is a good practice, even if the drain isn't clogged or draining slowly. The enzymes collect on organic material that may be lining the pipes and slowly digest them. Pout the cleaner into your drain once a month and you'll probably never have to bust a clog.
A volcano made by mixing white vinegar and baking soda can also help keep your drain clean, and you can also use it to freshen your garbage disposal. Pour in half a cup of baking soda and follow this with half a cup of vinegar and watch the foam fill the sink. When it dissipates, finish the cleaning procedure by pouring in a quart of boiling water to wash everything down the drain.


