Use Pool Noodles To DIY The Coziest Trendy Headboard On A Budget
We may receive a commission on purchases made from links.
The internet absolutely loves a pool noodle hack. They are everywhere! From child safety padding to door bumpers and decorative wreath inserts to trampoline spring guards, these long, hollow foam tubes can do it all. Plus, they are inexpensive, making most DIY pool noodle projects easy on the wallet.
However, can a pool noodle project look high-end, or do they always look like cheap technicolor foam pipes? Well, social media user Realitydaydream proved on TikTok that it is more than possible to make a pool noodle look chic when she created a gorgeous vertical channeled DIY upholstered headboard with the beloved foam tubes, some nubby boucle fabric, a piece of plywood, and a staple gun. Following her example, you can achieve the same great results.
Before you can start on this DIY, it is important to select the right fabric for the job. You can choose any upholstery weight option that suits your aesthetic, such as the ivory boucle from Amazon chosen by this TikTok user. A jewel tone or neutral velvet would also be stunning, as fabrics with a longer nap will be more forgiving with the upholstery process. Avoid patterns unless you are a seasoned upholsterer, as it can be very challenging to keep a pattern matched and straight for a DIY novice. Once you have your fabric selected, you are ready to DIY the cozy upholstered pool noodle headboard of your dreams.
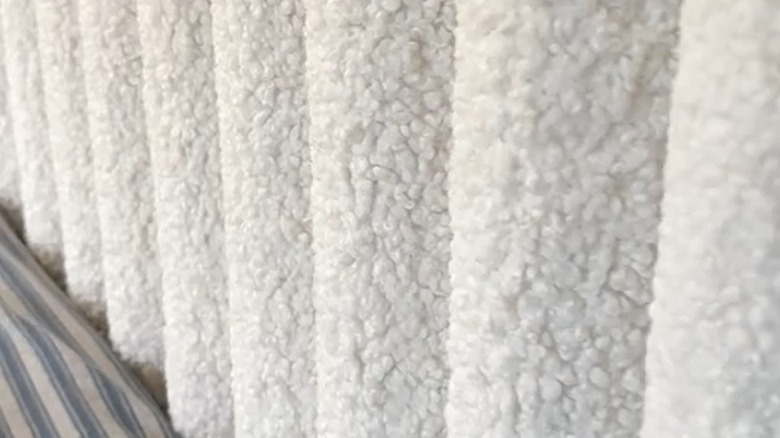
Creating the vertical channeled headboard effect with pool noodles
Now, let's figure out how to make your own padded headboard with pool noodles. Begin by cutting a piece of half inch plywood with a jigsaw tool to the desired size and shape, such as the curved top from the video. Line up the pool noodles vertically across the headboard, starting at the bottom where it will be showing above the mattress and cutting them to fit the shape of the plywood at the top (leave them a little long so you can trim to perfection later). Roll them aside, keeping them in order on the floor so you know which one comes next.
Now you are ready to work with your fabric. You can begin on one end or ensure a perfect center line by starting in the middle like in the video. Use a regular or pneumatic staple gun to secure the end of the fabric to the plywood, draping it over one pool noodle, and then securing it snuggly on the opposite side of the noodle to create a vertical bump. Simply slide the next pool noodle under the fabric right up against the previous one, and then staple the fabric to the plywood on the far side to create a second bump immediately next to the first. Repeat this step until you reach the end of the headboard, where you will wrap the fabric around the side of the headboard and staple it in place. If you began in the middle, repeat this process for the other side, working your way from the middle to the outer edge of the headboard. The result will look like high-end vertical channeling thanks to the noodle bumps.
Finishing the edges and alternate layouts for your noodle headboard
Once all of your pool noodles are in place and the fabric is wrapped around both sides of the plywood, it is time to deal with the bottom and top of the fabric. The TikTok video appears to start with the top, trimming any excess pool noodle as needed to make it perfectly match the curve of the plywood. Then tightly wrap the fabric over the top of one noodle at a time, folding the fabric correctly in the back to properly carry the vertical lines across the top of the headboard and securing it with staples to the back of the plywood as you go. For the bottom of the noodles, pull the fabric taut, ensuring the pool noodle is all the way up at the top, and then secure the fabric to the plywood underneath the noodle to hold everything in place. This being said, it would be easier to swap these two steps, beginning by securing the bottom of the fabric to the plywood to ensure a straight line all the way across the base. This also allows you to have something to press against when trimming the pool noodles at the top, giving you a more snug fit without the noodles moving around.
While the curved top with vertical channels is adorable, you could also do a chic rectangular shaped headboard with either vertical or horizontal bumps. Alternatively, you could create a center semicircle panel and then arch the pool noodles around the curve to create a rainbow shape with funky Art Deco arch vibes. Regardless of the shape or configuration you decide to use, grab pool noodles instead of foam to make your next upholstered headboard project a budget-friendly breeze.