Repurpose Old Concrete Pavers Into A Clever DIY Planter
One of the trickiest parts of building a DIY backyard patio or walkway is figuring out what to do with all the old concrete pavers you pull up along the way. Since even simple square ones can weigh up to 17 pounds each, loading up your car or truck, paying high dump fees, and unloading them all over again can do a number on your back and your wallet. It turns out there's a simple, affordable, and eco-friendly way to repurpose old concrete pavers into clever DIY planters that are substantial and look way more expensive than they really are.
Crafters on the hunt for budget-friendly DIY project ideas to spruce up a yard have figured out how to create cube-shaped planters using landscape adhesive and discarded concrete pavers. The process is surprisingly simple even if you're a beginner DIYer, as long as you have the right supplies. You'll need five clean concrete pavers in the same size and thickness. A few chipped edges are okay, but skip any seriously damaged pavers. If you don't have enough reusable ones, you can also purchase new Square Gray Concrete Patio Stones from Lowe's for under $2 each. To make the planters feel more high-end, it's a great idea to paint them before adding your plants. Regular exterior paint isn't ideal for concrete that swells and contracts during temperature fluctuations, so opt for an enamel-finish acrylic latex paint or specialty product like QUIKRETE Concrete Colorant instead.
Use basic supplies to construct and customize your planter
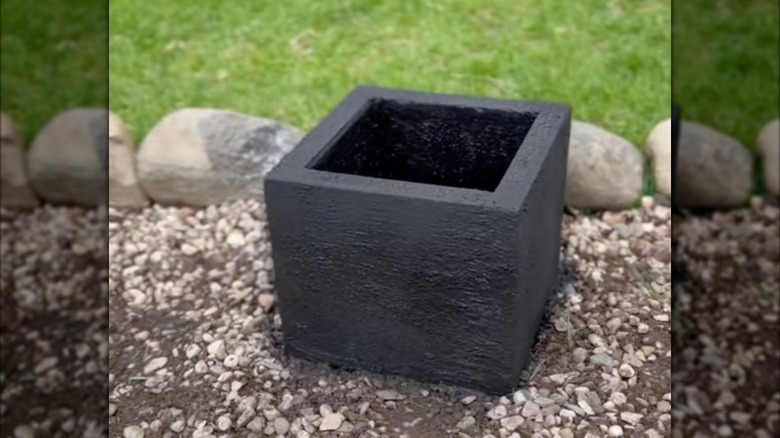
The trickiest part of this project is making sure your pavers are perfectly aligned while your landscape adhesive hardens them into place. Working on a flat surface, start with one paver as the base. Apply a generously thick line of adhesive like Liquid Nails or Locktite Exterior Construction Adhesive to the side of the base before pressing another paver into it vertically. Repeat the process around the base paver on all four sides until you've created a cube shape. Loctite cures within 15 minutes, although you have a small repositioning window after that to get the pavers exactly right. Use clamps, scrap wood, or sandbags to hold the pavers in place while they fully cure, a process that can take up to a week.
@wanderlustdiy Watch me. FREE list of supplies I used in my bio. Follow so you don't miss the next project! #concreteplanter #concrete #diy #diyproject
Next, it's time to paint. Although it's a totally optional step, coating your new concrete paver planters is an easy way to customize them. Applying a matte black coating or colorant with an inexpensive paintbrush can help you achieve a chic and modern look, but use any color that fits with your landscaping. You could even take things a step further by creating a mosaic using thrifted secondhand plates, affixing china pieces using more of the construction adhesive before covering each side in mortar.
The final step is positioning your clever DIY planter into place before filling it with plants. A single mounding "spiller" like creeping Jenny (Lysimachia nummularia) can be stunning, but you'll also have enough space to get creative with a mini arrangement.